Integrating Tracksend with Customer.IO
Set Up Tracksend With Customer.io
To get started with using tracksend to send messages on Customer.io, you’ll need to set up your account.
- Sign up / Sign in with Tracksend
- Create a Sender ID that you’ll be using to send messages
- Copy your API Key for the integration
You can proceed to create a campaign in Customer.io after finishing these initial steps.
To get started with using tracksend to send messages on Customer.io, you’ll need to set up your account.
- Sign up / Sign in with Tracksend
- Create an RCS Brand that you’ll be using to send messages
- Create an RCS Template Message
- Copy your API Key for the integration
You can proceed to create a campaign in Customer.io after finishing these initial steps.
To get started with using tracksend to send messages on Customer.io, you’ll need to set up your account.
- Sign up / Sign in with Tracksend
- Add / Create a Whatsapp Business Account that you’ll be using to send messages
- Create a Whatsapp Template Message
- Copy your API Key for the integration
You can proceed to create a campaign in Customer.io after finishing these initial steps.
Create Campaign On Customer.IO
Here are a series of steps to follow to start sending campaigns on Customer.io through Tracksend
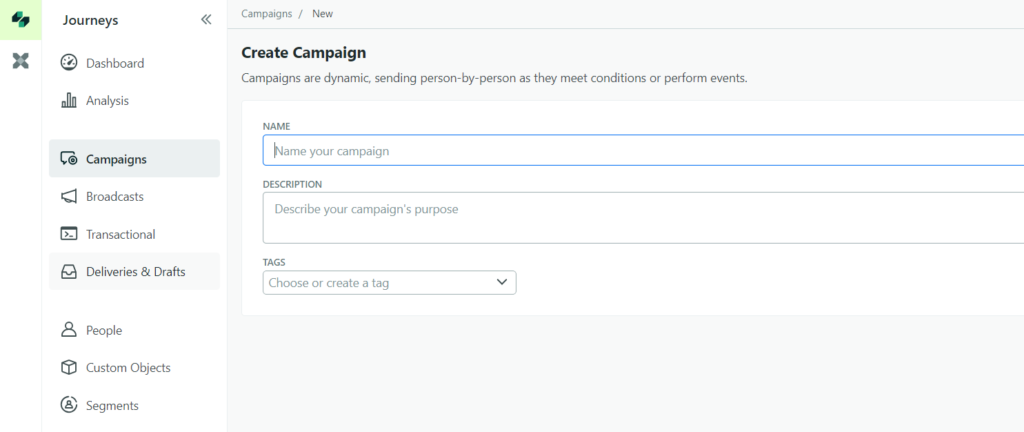
1. Go to Campaigns and click on Create Campaign
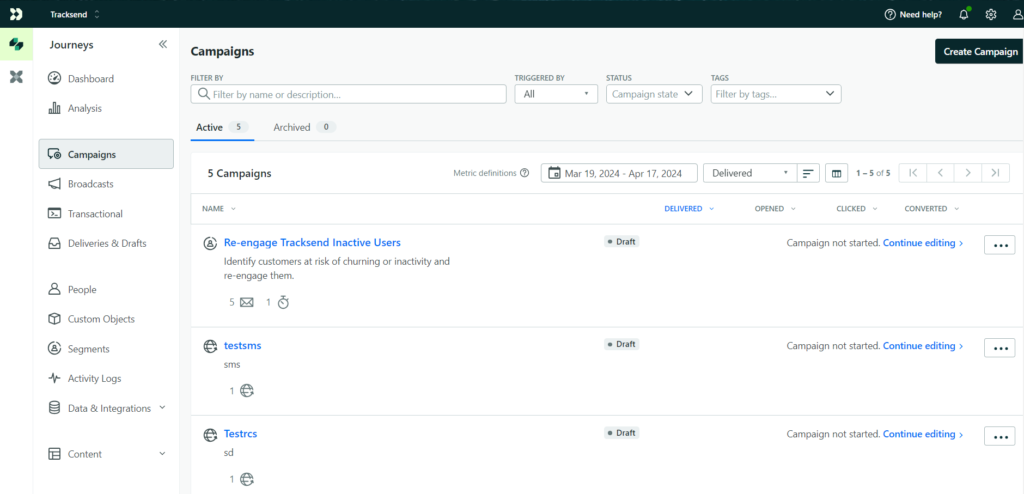
2. Enter your campaign details and click on Create Campaign.
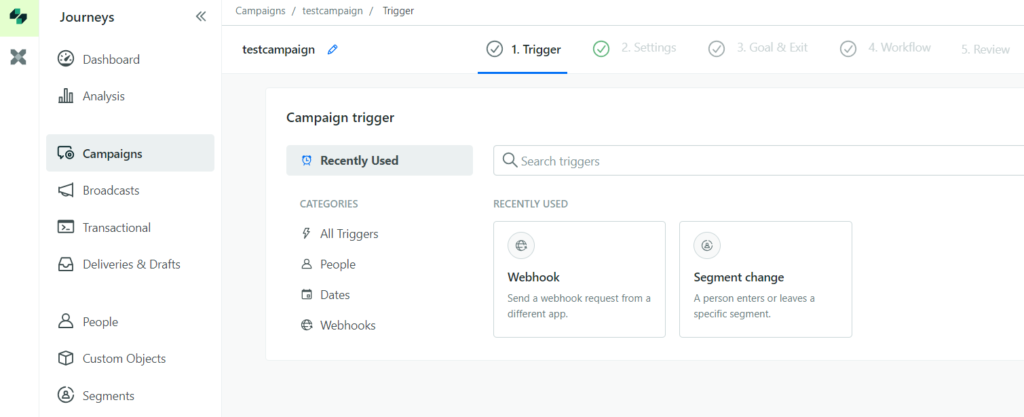
1. On the Triggers section select Webhook as your campaign trigger and click on Next
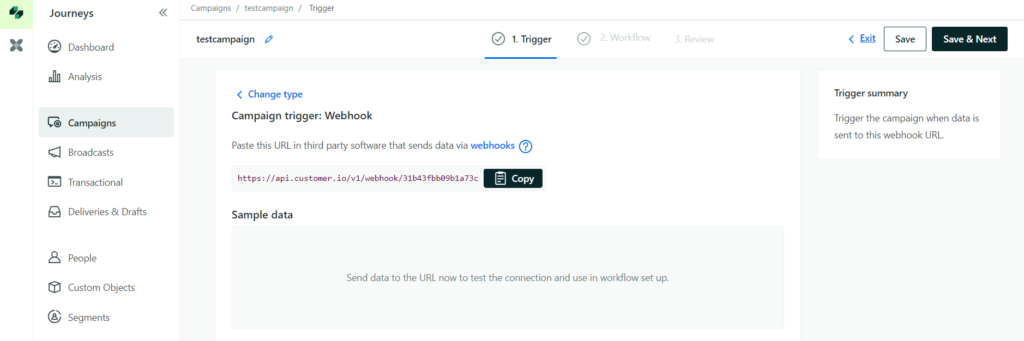
2. A webhook URL will be generated automatically, copy or access it later on the Created Campaign. Click on Save & Next
1. Drag the Send Data action to the Workflow canvas from the Build menu located under the Workflow section.
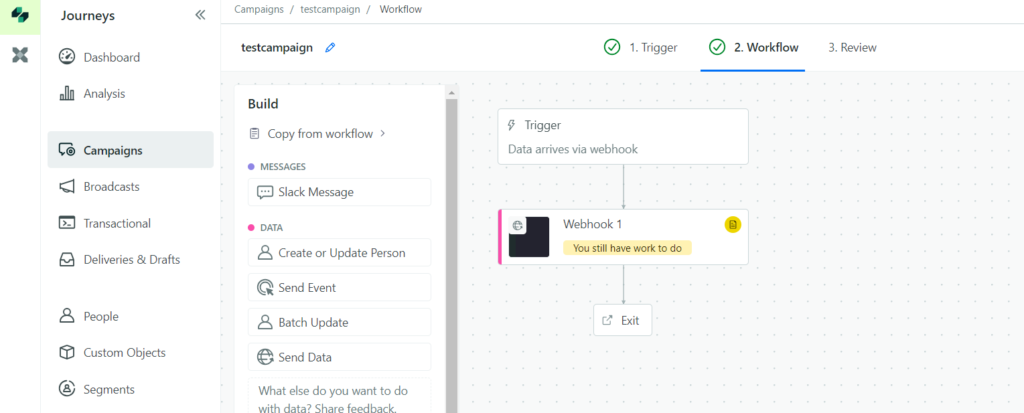
2. Click on your webhook and a window would be opened over the build menu
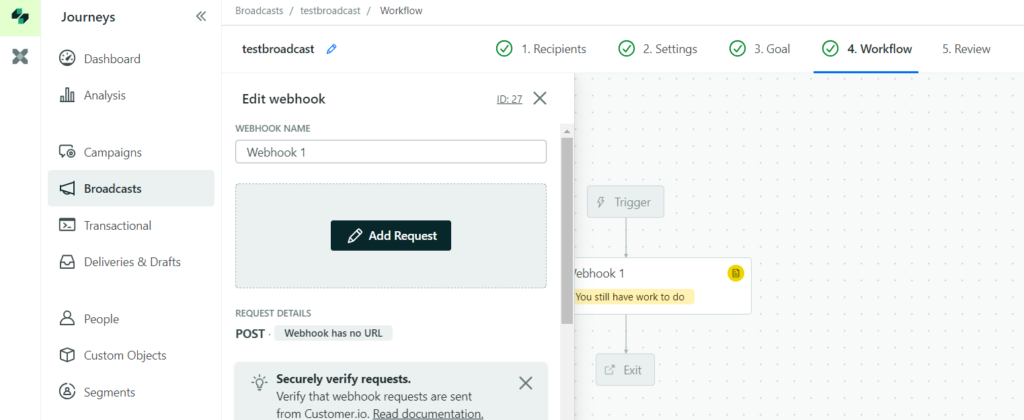
3. Name your webhook and click on Add Request
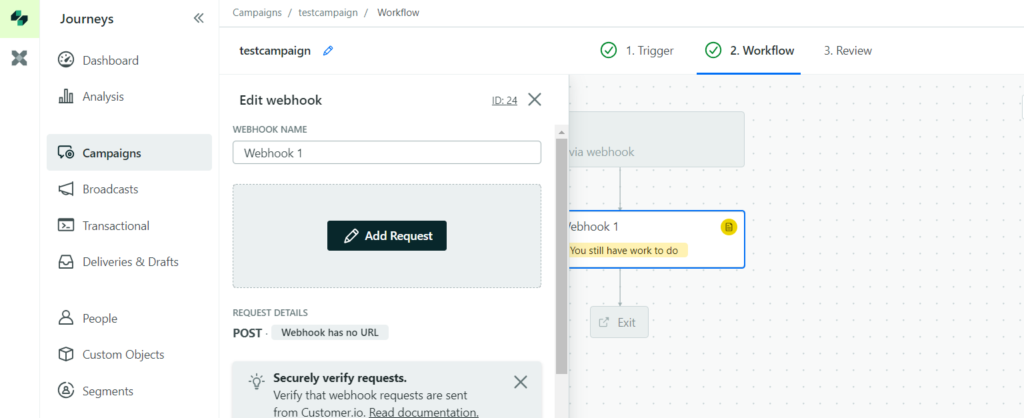
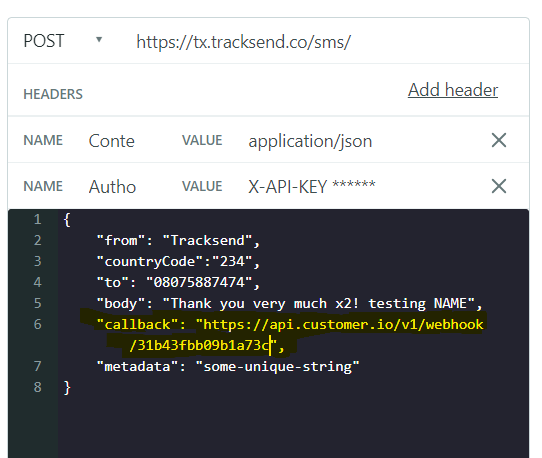
1. After Setting Up Your Webhook, you'll be redirected to setup your request for our API
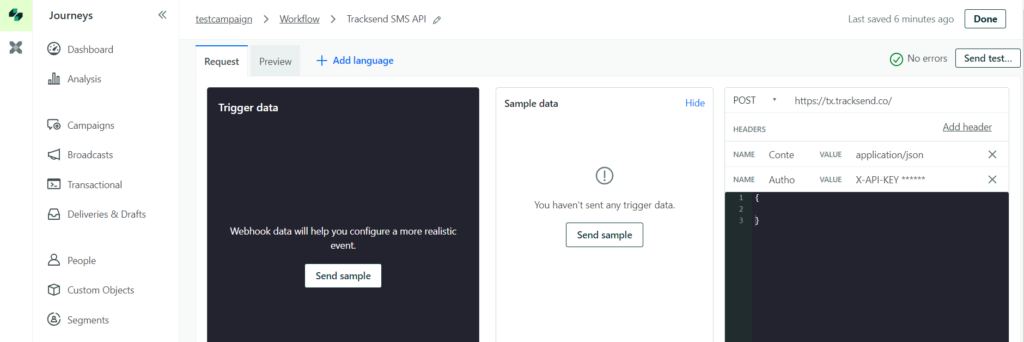
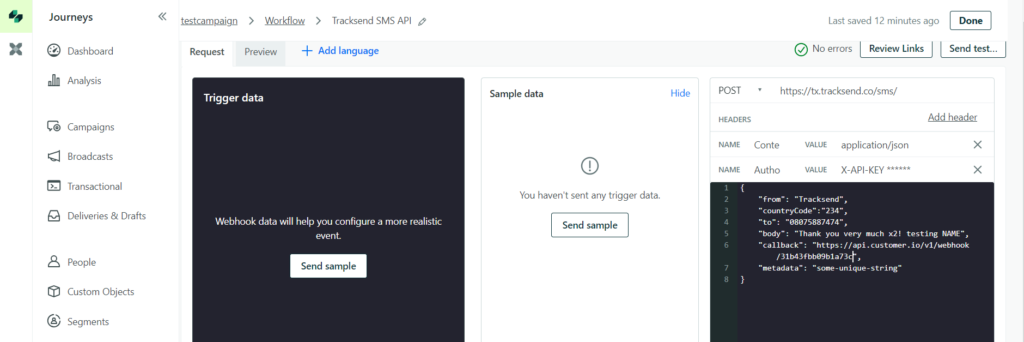
2. Select the “POST” method and add the API URL: https://tx.tracksend.co/sms/
3. Click on Add Header and add the content below
    Content-Type: application/json;
    Authorization: X-API-KEY {Your API KEY};
4. Copy your request payload here
{
    "from": "Tracksend",
    "countryCode":"234",
    "to": "08075887474",
    "body": "Thank you very much x2! testing NAME",
    "callback": "http://example.com",
    "metadata": "some-unique-string"
}
Checkout our documentation for more details on the payload here
5. Click on Save Changes
2. Select the “POST” method and add the API URL: https://tx.tracksend.co/rcs/
3. Click on Add Header and add the content below
    Content-Type: application/json;
    Authorization: X-API-KEY {Your API KEY};
4. Copy your request payload here
{
    "from": "Tracksend",
    "countryCode":"234",
    "to": ["07082632448"],
    "templateCode": "t-f80943c233b3be404703b57f1c6a0c03",
    "templateData": {
         "firstname": "John",
         "lastname": "Doe",
         "country": "Nigeria"
     },
    "callback": "http://example.com",
    "metadata": "5693142g3h1234"
}
Checkout our documentation for more details on the payload here
2. Select the “POST” method and add the API URL: https://tx.tracksend.co/whatsapp
3. Click on Add Header and add the content below
    Content-Type: application/json;
    Authorization: X-API-KEY {Your API KEY};
4. Copy your request payload here
{
    "to": ["07082632448"],
    "templateCode": "w-744483959940383",
     "templateData": {
         "firstname": "John",
         "lastname": "Doe",
         "country": "Nigeria"
     },
    "callback": "http://example.com",
    "metadata": "5693142g3h1234"
}
Checkout our documentation for more details on the payload here
1. Click the send test button to send your campaign
2. Add your copied webook url to your callback
Create Broadcast On Customer.IO
Here are a series of steps to follow to start sending broadcast on Customer.io through Tracksend
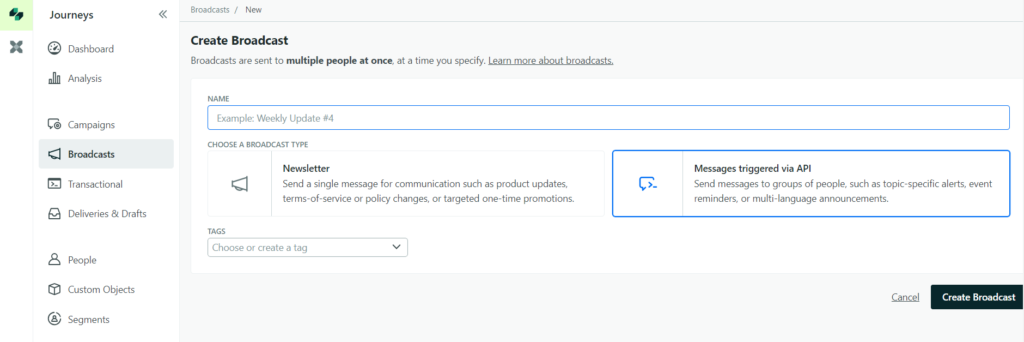
1. Go to Broadcast and click on Create Broadcast
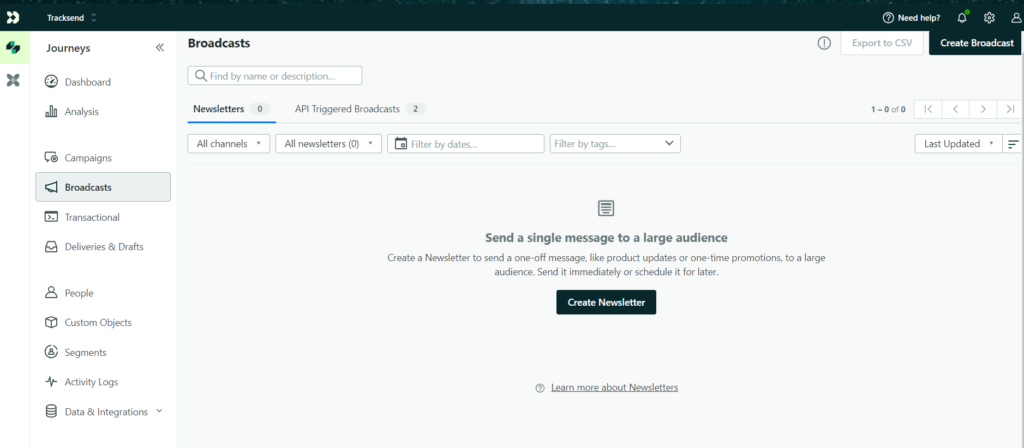
2. Enter your broadcast details and click on Create Broadcast.
1. On the Recipients section add recipients based on condition and click Save & Next
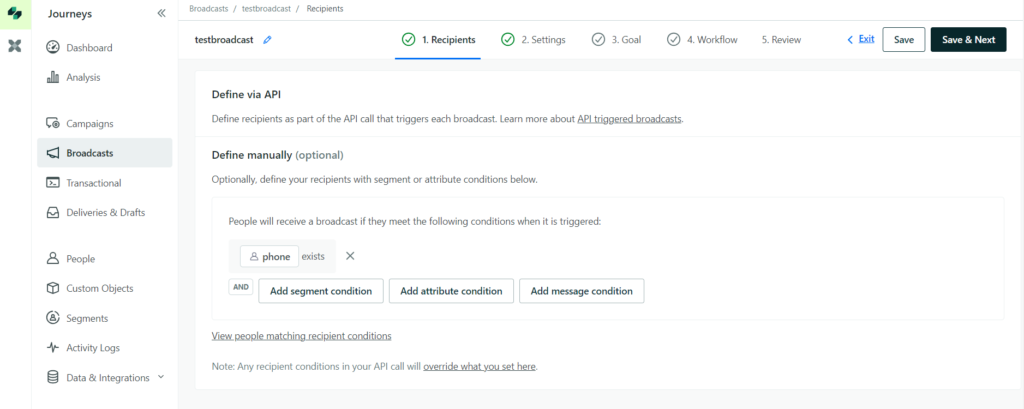
2. Configure your the Setting and Goal sections to your liking
1. Drag the Send Data action to the Workflow canvas from the Build menu located under the Workflow section.
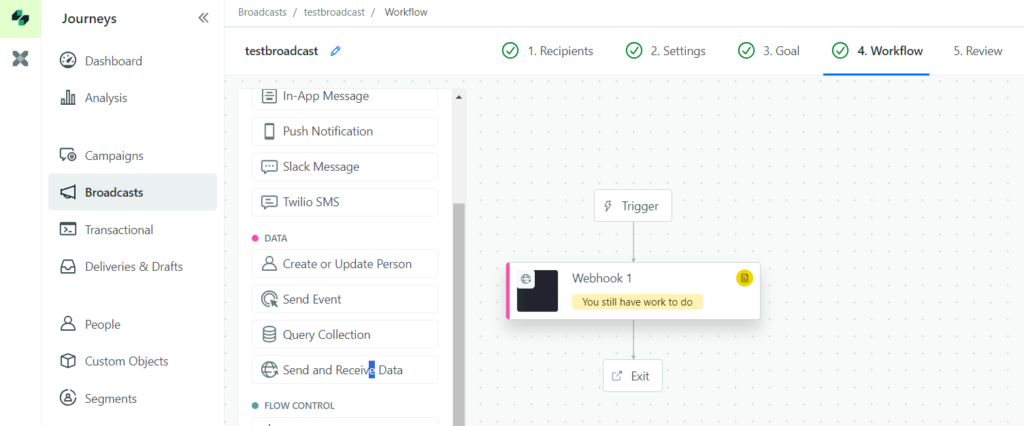
2. Click on your webhook and a window would be opened over the build menu
3. Name your webhook and click on Add Request
1. After Setting Up Your Webhook, you'll be redirected to setup your request for our API
2. Select the “POST” method and add the API URL: https://tx.tracksend.co/sms/
3. Click on Add Header and add the content below
    Content-Type: application/json;
    Authorization: X-API-KEY {Your API KEY};
4. Copy your request payload here
{
    "from": "Tracksend",
    "countryCode":"234",
    "to": "08075887474",
    "body": "Thank you very much x2! testing NAME",
    "callback": "http://example.com",
    "metadata": "some-unique-string"
}
Checkout our documentation for more details on the payload here
2. Select the “POST” method and add the API URL: https://tx.tracksend.co/rcs/
3. Click on Add Header and add the content below
    Content-Type: application/json;
    Authorization: X-API-KEY {Your API KEY};
4. Copy your request payload here
{
    "from": "Tracksend",
    "countryCode":"234",
    "to": ["07082632448"],
    "templateCode": "t-f80943c233b3be404703b57f1c6a0c03",
    "templateData": {
         "firstname": "John",
         "lastname": "Doe",
         "country": "Nigeria"
     },
    "callback": "http://example.com",
    "metadata": "5693142g3h1234"
}
Checkout our documentation for more details on the payload here
2. Select the “POST” method and add the API URL: https://tx.tracksend.co/whatsapp/
3. Click on Add Header and add the content below
    Content-Type: application/json;
    Authorization: X-API-KEY {Your API KEY};
4. Copy your request payload here
{
    "to": ["07082632448"],
    "templateCode": "w-744483959940383",
     "templateData": {
         "firstname": "John",
         "lastname": "Doe",
         "country": "Nigeria"
     },
    "callback": "http://example.com",
    "metadata": "5693142g3h1234"
}
Checkout our documentation for more details on the payload here
1. Click the send test button to send your broadcast
2. Add your copied webook url to your callback